 MathCS.org - Android
Dialogs and Menus
java -> android -> dialogs and menus ...
Now we will complete our tour of simple Android activities with a look at dialogs and menus. We will start with dialogs. There are several dialogs, ranging from simple alert boxes to inform the user to complex dialogs including their own layout and UI elements. They all extend the basic Dialog class.
AlertDialog, DatePickerDialog, and Friends
The simplest form of a dialog is the AlertDialog. It has several forms, each having at least a title and a message string as well as:
- no buttons to simply inform (use the Android "back" button to dismiss)
- one button (gets dismissed if button is clicked or Android "back" button)
- two buttons, one is considered "positive", the other "negative" (gets dismissed if either button is clicked or Android "back" button)
- three buttons, one positive, one negative, one neutral (gets dismissed dismissed if either button is clicked or Android "back" button)
Let's try them out, say in a new project callled FirstDialog. For simplicity we'll create a simple program with one button, which when clicked will bring up our desired dialog. We don't even need an XML layout file. Here is the basic code:
First, here is the basic code with a button, layout, event handler, and all. Clicking on the button will call the showDialog method, which right now shows a brief toast:
public class FirstDialog extends Activity
{
	// define our button
	private Button button = null;

	// define the button click handler as an inner class
	private class ButtonHandler implements View.OnClickListener
	{
		public void onClick(View v)
		{
			showDialog();
		}
	}

    	public void onCreate(Bundle savedInstanceState)
    	{
        	super.onCreate(savedInstanceState);

        	// initializing button, including layout parameters
        	button = new Button(this);
        	button.setText("Show Dialog");

        	// attaching the button handler
        	button.setOnClickListener(new ButtonHandler());

        	// defining the layout in code instead of XML
        	LinearLayout layout = new LinearLayout(this);
        	layout.addView(button, new LayoutParams(LayoutParams.FILL_PARENT, LayoutParams.WRAP_CONTENT));

        	// setting the view to our newly created layout
        	setContentView(layout);
    	}

   	private void showDialog()
    	{
    		Toast.makeText(this, "Button pressed", Toast.LENGTH_SHORT).show();
    	}
}
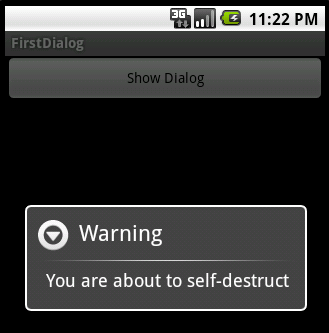 Next,
let's change the showDialog method to
show a simple alert dialog with no buttons:
Next,
let's change the showDialog method to
show a simple alert dialog with no buttons:
 private void showDialog()
{
	AlertDialog.Builder alert = new AlertDialog.Builder(this);
    	alert.setTitle("Warning");
    	alert.setMessage("You are about to self-destruct!");
    	alert.show();
}
To dismiss this message you need to press the Android "back" button.
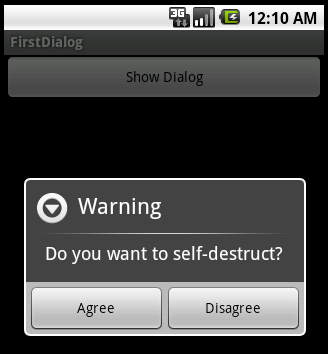
Now let's create an alert dialog with two buttons. We need to not only create the dialog but also provide a handler to define what should happen if one of the buttons is pressed. Just as we defined ordinary event handlers as inner classes, we will again define the dialog button handlers as inner classes, but implementing a different interface. Also, that one handler will handle both button events for us:
// define one dialog button handler for all dialog buttons
private class DialogButtonHandler implements DialogInterface.OnClickListener
{
	public void onClick(DialogInterface dialog, int button)
	{
		// we need to decide which button caused the event
		if (button == DialogInterface.BUTTON_POSITIVE)
			Toast.makeText(FirstDialog.this, "Agreed", Toast.LENGTH_SHORT).show();
		else if (button == DialogInterface.BUTTON_NEGATIVE)
			Toast.makeText(FirstDialog.this, "NOT Agreed", Toast.LENGTH_SHORT).show();
	}
}
 Now
we need to define the alert dialog with two buttons and hook them up
with one instance (not two - why not?) of our dialog button handler:
Now
we need to define the alert dialog with two buttons and hook them up
with one instance (not two - why not?) of our dialog button handler:
 private void showDialog()
{
    	// define a single name instance to use for both buttons
    	DialogButtonHandler handler = new DialogButtonHandler();

    	// setting up the dialog two buttons, same handler
    	AlertDialog.Builder alert = new AlertDialog.Builder(this);
    	alert.setTitle("Warning");
    	alert.setMessage("Do you want to self-destruct?");
    	alert.setPositiveButton("Agree", handler);
    	alert.setNegativeButton("Disagree", handler);
    	alert.show();
}
Exercise: What happens when you click on "Agree"? How about "Disagree? How about the Android "back" button? How would you create a dialog with three buttons, including a neutral one?
The DatePicker and TimePicker dialogs are, hopefully, simple enough to implement as far as dialogs go, but it can be a little tricky to handle dates. After all, dates are inherently tricky (some months have 30 days, or 31, or 28, or 29), there are leap years, and different countries have different conventions for formatting dates and times (month first, day first, am/pm, 24 hour clock, etc). The code shown below will put up a date picker dialog with today's date shown, and will return a date properly formatted for the conventions of the country the device is set to.
First we define the handler, i.e. the function to execute if a date was set:
// define a handler for the date picker dialog
private class DatePickHandler implements DatePickerDialog.OnDateSetListener
{
	public void onDateSet(DatePicker view, int year, int month, int day)
	{
		// Calendar imported from java.util.Calendar
		Calendar picked = Calendar.getInstance();
		picked.set(Calendar.YEAR, year);
		picked.set(Calendar.MONTH, month);
		picked.set(Calendar.DAY_OF_MONTH, day);
		// DateFormat imported from java.text.DateFormat
		String date = DateFormat.getDateInstance().format(picked.getTime());
		// now the selected date is properly formatted so we display it
		Toast.makeText(FirstDialog.this, "Picked: " + date, Toast.LENGTH_SHORT).show();
	}
}
And here is a sample method that brings up a date picker dialog, hooked up to the above handler:
 private void showDateDialog()
{
	// constructing today's date
    	Calendar calendar = Calendar.getInstance();
    	int year = calendar.get(Calendar.YEAR);
    	int month = calendar.get(Calendar.MONTH);
    	int day = calendar.get(Calendar.DAY_OF_MONTH);
        //instantiating the handler
    	DatePickHandler dateHandler = new DatePickHandler();
	// creating and showing the dialog
    	DatePickerDialog dater = new DatePickerDialog(this, dateHandler, year, month, day);
    	dater.show();
}
Other frequently used dialogs include preference dialogs, but we will discuss preferences later.
Menus
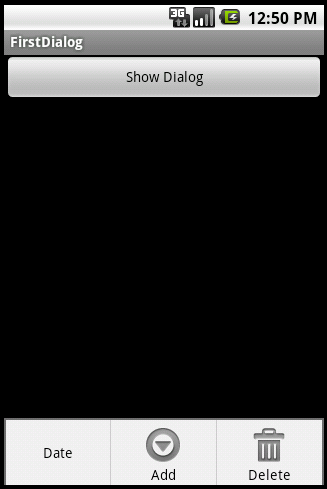
Menus are another easy way to get user input. Android offers two types of menus:
- Options Menu: shown at the bottom of the screen when the user presses the device "menu" key. Within the Options Menu are two groups of menu items, Icon Menus and Expanded Menus. Up to six Icon Menus are shown at the bottom of the screen and they can not include checkboxes or radio buttons. The Expanded Menu is a vertical list of items that shows up when the 6-th standard menu item "More" is selected, if there are more than 6 Icon Menus
- Context Menu: This is a floating list of menu items that may appear when you perform a long-press on a View (such as a list item).
Option menus are used so frequently that there are standard methods included in an Activity that you can override instead of defining special handling classes:
- To define menus, override onCreateOptionsMenu(). Each menu item gets a unique integer id to identify it. You can define menu items in code or via XML.
- To handle menu selections, override onOptionsItemSelected(). To determine which menu cased an event, use getItemId(), which returns the menu's unique integer id.
Here is an example, which you can add to our previously defined FirstDialog activity. First we define unique integer id's as constant fields for number of menu items and submenus:
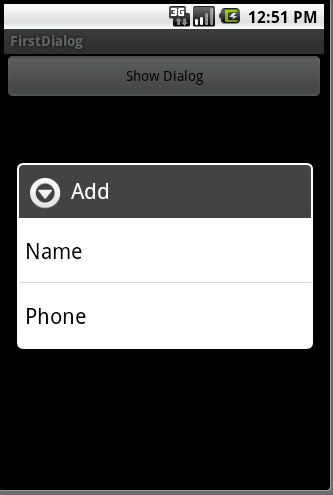
	private static final int MENU_DATE = 101;
	private static final int MENU_ADD = 102;
	private static final int MENU_ADD_NAME = 1021;
	private static final int MENU_ADD_PHONE = 1022;
	private static final int MENU_DEL = 103;
Next we define the menu by implementing onCreateOptionsMenu. The first input is the group id or NONE, the second is the menu id, which must be unique to this menu item, third comes the desired order or NONE, and finally the string the menu item should show (which should really be defined in a String resource). We could optionally attach icons to each menu item, which is recommended to enhance your app look, and we can define submenus (but not nested submenus). The following code should explain it:
	public boolean onCreateOptionsMenu(Menu menu)
	{
		MenuItem dateMenu = menu.add(Menu.NONE, MENU_DATE, Menu.NONE, "Date");
		SubMenu addMenu = menu.addSubMenu(Menu.NONE, MENU_ADD, Menu.NONE, "Add");
		MenuItem delMenu = menu.add(Menu.NONE, MENU_DEL, Menu.NONE, "Delete");

		addMenu.setIcon(android.R.drawable.ic_menu_more);
		delMenu.setIcon(android.R.drawable.ic_menu_delete);

		addMenu.add(Menu.NONE, MENU_ADD_NAME, Menu.NONE, "Name");
		addMenu.add(Menu.NONE, MENU_ADD_PHONE, Menu.NONE, "Phone");

		return super.onCreateOptionsMenu(menu);
	}
It defines two menus, one submenu with two additional submenu items, and sets two menu icons from a set of standard Android system resources. Finally we define the handler not in an inner class but simply by implementing onMenuItemSelected:
	public boolean onMenuItemSelected(int panelId, MenuItem item)
	{
		if (item.getItemId() == MENU_DATE)
			showDateDialog();
		else if (item.getItemId() == MENU_DEL)
			Toast.makeText(this, "delete selected", Toast.LENGTH_LONG).show();
		else if (item.getItemId() == MENU_ADD_NAME)
			Toast.makeText(this, "add name selected", Toast.LENGTH_LONG).show();
		else if (item.getItemId() == MENU_ADD_PHONE)
			Toast.makeText(this, "add phone selected", Toast.LENGTH_LONG).show();

		return super.onMenuItemSelected(panelId, item);
	}
Note that the "Add" menu brings up its submenu automatically. Here is how everything will look when you press the device's "menu" key and select an item with a submenu:
 |
 |
| Activity with menus and icons | Activity with submenu selected |
General Dialog
This leaves us to discuss how to create an arbitrary dialog with its own layout and views. However, while applications for other operating systems (Windows) frequently use dialogs, and rather complex ones at that, Android rather switches from one activity to another instead of having one master activity with many menu and dialog choices. Therefore, general dialogs are less important in Android whereas the interconnectedness of activities is much more important. We will discuss that in the next segment, but we do want to explain how to create a simple "input" dialog for getting text input from the user.
To create a custom dialog, it is easiest to define its layout in XML, just like we've done for regular programs. Create a resource layout file inputdialog.xml that contains a text input field with ID @+id/dialog_field and a button with ID @+id/dialog_okay. Below is the corresponding XML raw file:
<?xml version="1.0" encoding="utf-8"?>
<LinearLayout xmlns:android="http://schemas.android.com/apk/res/android"
    android:orientation="vertical"
    android:layout_width="fill_parent"
    android:layout_height="fill_parent">

    <EditText android:id="@+id/DialogField"
           android:layout_height="wrap_content"
           android:layout_width="fill_parent">
    </EditText>
    <Button android:id="@+id/DialogOkay"
           android:layout_height="wrap_content"
           android:layout_width="fill_parent"
           android:text="Okay">
    </Button>
</LinearLayout>
To create one or more dialogs - much like menus - you need to put your code into the inherited method onCreateDialog(int id) of your activity. That ensures that the dialog is properly owned by its parent and can easily be shown and dismissed. Here is how to create a single dialog. If you needed to create more than one, enclose their creation code in if statements for the different ID's. But before we do that, we define the dialog's text field, its button, and the dialog itself as fields as well as and its id as a constant:
	// define dialog ID
	private static final int DIALOG_INPUT = 101;

	// define dialog, dialog button and dialog field
	private Dialog dialogInput = null;
	private Button dialogOkay = null;
	private EditText dialogField = null;
Now as advertised we implement the onCreateDialog method. We only have one dialog to implement, so we don't really need to look at the dialog id.
	protected Dialog onCreateDialog(int id)
	{
		// initializing the dialog from XML and setting a title
		dialogInput = new Dialog(this);
		dialogInput.setContentView(R.layout.inputdialog);
		dialogInput.setTitle("Enter your name:");

		// initializing the button and field of the dialog from XML
		dialogOkay = (Button) dialogInput.findViewById(R.id.DialogOkay);
		dialogField = (EditText) dialogInput.findViewById(R.id.DialogField);

		// attaching a standard button handler to our button
		dialogOkay.setOnClickListener(new ButtonDialogHandler());

		// return the initialized dialog
		return dialogInput;
	}
Now we of course need to implement the button handler. It should retrieve the text from the input field and dismiss the dialog:
	private class ButtonDialogHandler implements View.OnClickListener
	{
		public void onClick(View v)
		{
			Toast.makeText(FirstDialog.this, "Input: " + dialogField.getText(), Toast.LENGTH_SHORT).show();
			dialogField.setText("");
			dialogInput.dismiss();
		}
	}
Note that this method dismisses the dialog, which is the reason we defined it as a field. You could also get a reference to it from the view in the method's argument.
To bring up the dialog you simply call the inherited method showDialog(int id), where id is the identifier of the dialog to show. If this is the first time you call the method, the dialog is created automatically via the onCreateDialog(int id) method. If you bring it up subsequently, the dialog resources are reused. If you are sure you no longer need the dialog you can release its resources by calling the inherited method removeDialog(int id) with the right dialog id.
You can also intercept the "cancel" event when the dialog is dismissed via the devices "back" button. You need to create inner classes implementing DialogInterface.OnDismissListener and/or DialogInterface.OnDismissListener for that and attach them to the dialog.